- Research into how simplicity can be achieved resulted in finding that there are many process that can be used, specifically reduction, organisation and metaphor.
- These processes allow you to communicate more with less- especially when using visual metaphors- multiple levels of meaning communicated.
- Evidence to suggest that feelings can be imbued within the viewer using these techniques due to the way the brain works. – visually, simple easier to process and remember, complicated implies feeling of being lost etc.
- Sub-question, can images be simple, aesthetically pleasing and communicative? Use of metaphor allows for this and means that this is better remembered.
- Remembrance is key within the realms of visual communication.
- As is comprehensibility. Needs to communicate the right thing for that context and audience, and this must be understood with imperceptible effort- therefore should only communicate what is necessary. – surplus information should be removed
- Case study shows that methods can be applied to other complex things such as narrative. Intention was to create something that could be understood by different cultures and languages. Achieved through reduction to simple shapes alongside key.
- As found in reflective practice, the amount of information included can be reduced when placed alongside text- this does not take away from image, just adds to or fixes meaning.
- All of this information suggests that simplicity can be as communicative as complexity if not more, and ways in which this can be achieved.

Friday, 29 December 2017
Points for Conclusion
Tuesday, 26 December 2017
Kaapshljmurslis - Development
Process:
This was the final symbol to create and happened to be the most difficult. I knew the concept of this one was to represent the feeling of being cramped on public transport and that I wanted to use shapes for this. I thought using triangles could make this easier so I tried that first. I made one a circle to create an 'individual' and make them seem more like people.. Overall this didn't look right, and the use of the circle make it more complicated that it already seemed. I changed this to triangles as well and it still didn't work well to communicate the definition, I thought. I tried making all of the shapes bigger and closer together, which ended up taking a longer time than expected but again produced a quite average and busy final result. To tackle this I tried using equilateral triangles but had no joy. Another attempt was made by scanning in one of the roughs that looked okay and going round each shape with the pen tool. This ended up being a waste of time as it looked worst that the first few attempts. I tried changing the colours but it looked overly-complicated and messier. Finally, I tried creating shapes with four or five sides and curved the edged quite a bit which gave the effect that they were once rounder and were now being squashed. This worked a lot better! The red-orange was used to represent 'warmth' and 'intensity' but this was a bit overpowering. I changed all but one to grey and I'm so much happier with it now. This might be one of my favourites.
Pochemuchka - Development
Process:
This again was a pretty straightforward to create as I spent time trying to make the question mark look accurate and fit the space within the frame nicely when roughing. It took a few attempts to get the curves of the question mark super smooth and to make sure the thickness was the same all the way round. With a lot of tweaking I think it turned out pretty good. I then created a dot which had the same diameter as the question mark to keep everything consistent. This was place in the centre of the space on the right to create balance. Due to the simple nature of the definition, I could choose pretty much any colour. I wasnted something quite bright and started with a mustard yellow. This then changed to a bright green in the end to make it dissimilar to the colour of the sunrise symbol.
Tuesday, 19 December 2017
Reflective Practice - Symbol Analysis
To make it easier to know which examples to talk about in the reflective practice part of my essay, I did a quick analysis of each of the symbols I created.
Schadenfreude:
- Very reductive - achieved through use of shape
- Happy/ evil face = 'pleasure from someone's misfortune'
- Upside down sad face = 'pain'/'misfortune'
- Organised to fit the space better and allow for a simpler aesthetic - not overly complicated
- Angle of 'eyes'/'mouths' creates the effect of a single line that runs across both sections of the face- reduction
- Metaphor - two faces in one
- Metaphor - line as facial features
- Colours - blue = sadness/ red = pleasure + danger
Hygge:
- Everything reduced down to just circles of varying sizes and colours
- Colour - pink = love
- Metaphor - circles and dots for people - pink strip linking the dots creates the illusion of arms and people hugging or holding hands.
- Colour for small dots helps - peachy colour - learnt associations, associate this colour with skin even if not the colour of own own
- Plate = metonym - represents all food
Saudade:
- Extremely reduced - picked out necessary things
- Use of negative space communicates 'longing'/ 'incompleteness' - something missing
- Metaphor - rectangle with rounded end creates fingers
- Colour - subdued, slightly green = renewal - new life without something
- Muted = sadness
Kaapshljmurslis:
- Reduction to just shapes
- Similar and repeated- fit together closely - organisation
- Highly unmotivated visual metaphor - shapes represent people - assisted by the addition of text
- Seems complex as there are lots of shapes but this is used purposefully to mimic idea of lots of people being cramped - claustrophobia - complexity and simplicity need each other
- Colour - grey for most - not individuals in this context, everyone is in the same position- unable to do anything
- Selected one to be the focus and illustrate the individual feeling of uncomfortableness and warmth - red-orange = warmth and intensity
Pochemuchka:
- Commonly known symbol of question mark used - learnt conventions - familiar to lots of people
- Organised differently - dot not where it usually is, but mind still processes as a question mark
- Metaphor - face also visible to clearly represent that the word is about a person, not just about questions - just enough information, not too little
- Colour - green = youth/ inexperience
Litost:
- Simple shapes that fit into each other - reduction and organisation
- Visual metaphor - tear shape also makes up shape of an eye (= sudden sight) eyelashes pointed to look aggressive = torment
- Colours - blue = sadness/ depression/ dark grey = serious, self-denial + self-discipline/ white = emptiness
Gigil:
- Reduction - not too many different elements - two different types
- Metaphor - rectangles with one rounded side to create the appearance of fingers- due to placement around shape inside and flesh colour
- Shape inside essentially just a squashed square- metonym for all cute things
- Colour - pale purple - commonly used in children's product advertising- cute
Gokotta:
- Reduction - use of simple shapes- basic circle, rectangles and triangles
- Also seems more reduced due to use of cropping - how much information is necessary
- Contains 3 visual metaphors - all in one - the sun rise, birds (open beak = singing) and a clock = early in the morning
- Colours - yellow = sun, uplifting, enthusiasm for life/ orange = beak, energy, vitality.
Friday, 15 December 2017
Gokotta - Development
Process:
To begin with I made a large circle shape. I found this was too high so I moved it down to where it's placed within most of my roughs for this symbol. I was happy with this placement as I felt it reflected the idea of sunrise well. Only the top of the 'sun' was visible. However, when it came to adding the other elements I realised this placement wouldn't work for the visual metaphor I was trying to create. I needed the bottom edge of the frame to be the centre of the circle as I was going to place a black dot and a 'beak' to mimic the center of a clock and the hands. So, I recreated the circle- (the placement looked fine still). I changed the clocks hands from black to orange as it made it more obvious that this was a beak. Finally, I curved all the edges a bit to make it less harsh. Though this was one of the symbols I wasn't sure about when roughing, I now feel like this is one of my favorites. It just shows how much playing and experimenting digitally makes something easier for me to visualise.
Hygge - Development
Process:
Gigil - Development


Process:
This again was one that wasn't too difficult to create, possibly because I was happy with the composition within one of the roughs and was able to use this as a reference for the digital one. I created the fingers the same was as in the last post, by creating a rectangle and curving the two corners as far as they would go. I then made the squishy shape by drawing a square but adding points on both sides of the fingers where they meet the edge of the frame, and one at the point of the finger. Curving these points made the square appear squashed.

The colours used to begin with were just for the ease of being able to see the different elements while working. I then changed this to a pastel purple- a colour I believe represents 'cute' well and then found the fingers were too light. I then kept adjusting the colours (which I forgot to take screeshots of) until they contrasted well.
Tuesday, 12 December 2017
GIF - planning
I decided to plan out the movements for potential gifs. I wanted to keep these as simple as possible to not overly-complicate the simple images. I realised after knowing I wanted to rotate the schadenfreude that the frame has to be bigger in order to make sure corners aren't cut off. I'll make the frame the same for all the others to keep this consistent throughout.


Monday, 11 December 2017
Saudade - Development


Process:
This one was actually one of the easiest to make. I simply created the frame which I coloured a grey-blue-green colour. I just wanted this to be quite subdued to reflect the sadness of the definition and to be dissimilar to any other colours as I want each of the symbols to be individual but work nicely as a set. To create the fingers I simply created a long rectangle and curved both of the corners on one side as far as they could go. I then copied this four times to create the other fingers and placed them where I thought they should go- referring back to my rough. I then used the divide tool in the pathfinder window to cut out the finger shapes from the background and deleted the excess. This left a negative space, which reflects the definition as it suggests the notion of something not returning. By using negative space, this could subtly suggest that there is a space left where something once was.
Schadenfreude - Development
Process:
I started this symbol by creating the zigzag or 'lightning bolt' within the center. I wanted both sides to be exactly the same so made sure to have rulers on so I could check this. I then made the eyes/ mouths by creating a line and adjusting the thickness. Choosing colours happened to be the most difficult part. I chose red for the 'evil' side as this signifies 'pleasure' and 'danger' and a blue for the other side, which signifies 'sadness'. Though there isn't a huge different between all the blue-grays tried, I'm a bit of a perfectionist and most shades didn't feel right next to the red. It was either too light or too dark or too green, but I got there in the end. Though I made sure the space from the top and bottom edge were the same distance from the center of the lines creating the eyes and mouths (imagine they were joined), the facial features seemed a bit too high. This made it look uneven so I brought them down a little. The final image shows the end result. I actually made this change quite late on- after making all the other symbols digitally. I felt as though the lines were all too close and too sharp so I made the spaces bigger and curved the corners slightly and it now works better alongside the others. I'm happy with this one I think. I just hope the upside down face is visible enough. To try and make it more obvious I am going to animate it to rotate.
Litost - Development
Process:
I have begun to start working on the digital versions of the symbols. I wasn't sure which rough to choose so I just started to make using vectors. I started by making the shape of a tear. I then lowered the opacity, duplicated it and turned it upside down to create an eye. The first image shows how this turned out I found that the sides of the tear were too straight so when flipped it didn't look how I intended it to. I then tried curving the sides a little and changed the colour of one and it looks much better (I think)! Hopefully it looks like both a tear and an eye- creating a visual metaphor. I then experimented with the sharp lines/ eyelashes which are supposed to represent 'torment'. I kept changing the placement of this to see how it'd look as something seemed a little off. The one with the eyelashes attached on both sides looks a bit like a bug. Thinking back to a quote from one of my theorist, a symbol shouldn't lend itself to the wrong interpretations, so I got rid of one side of lashes. I then played around with colour. I changed part of the eye to white as there wasn't much contrast, creating a flatter looking image. The white then made the whole symbol quite bright- giving off the wrong connotations as the definition is quite melancholic. The final step was the change the two shapes in blue that make up the tear within the eye to be more similar, as feedback from a peer review suggested it was a bit difficult to see.
Friday, 8 December 2017
Chosen Symbols
I went through all of the sketches for the different symbols and chose which ones I thought were strongest. I've selected the ones that I believe communicate the most in the simplest form, but also represent the necessary information within the definition most effectively. I've chosen 8 symbols in total, which will be applied to various things. Ideas for these are shown below.

Selected words:
- Litost (Czech)
- Schadenfreude (German)
- Saudade (Portuguese)
- Gigil (Filipino)
- Hygge (Danish)
- Gokotta (Swedish)
- Pochemuchka (Russian)
- Kaapshljmurslis (Lithuanian)
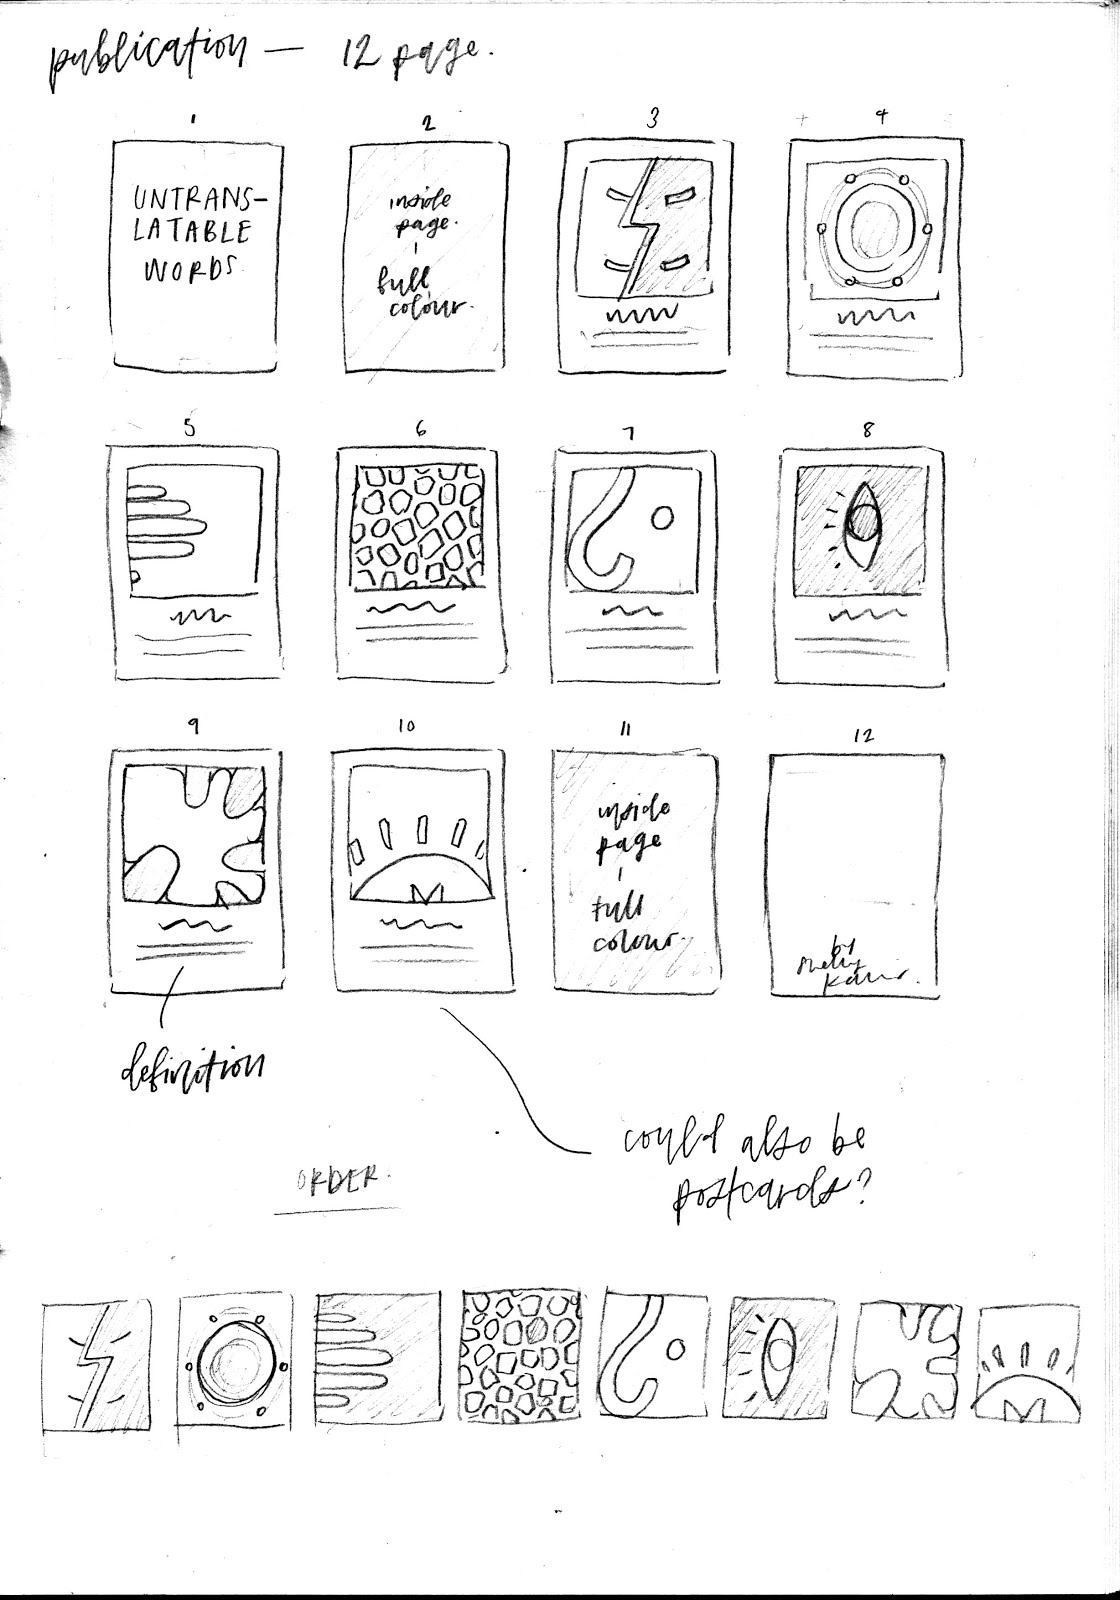
I am thinking about putting the images into a publication as well as a poster and postcards. I also want to try animating some of them. Probably not all of them because I struggle with animation- but possible around 5 or 6. I'll keep these quite simple to reflect my theme and leave less room to make mistakes.
Also,
https://www.color-meanings.com/
http://www.empower-yourself-with-color-psychology.com/meaning-of-colors.html
I used the following sites to help me choose/ adjust the colours of my symbols. I used ones that represent not only the definition of each work, but also the tone I was trying to achieve.
Wednesday, 6 December 2017
Essay Restructuring
When reading back over my essay I got a bit lost trying to restructure so I made a little spider-diagram about the main points and where there could be links.


Tuesday, 5 December 2017
Essay Draft & Feedback
My essay feedback was really helpful. The content is okay, there could be more triangulation and more explicit links between different points that connect. Also needs a bit of re-structuring and re-arranging and obviously the rest needs to be written up from note form. Jamie also mentioned three key points that I'd spoken about so far- reduction, organisation and visual metaphor and thinks I should expand on these processes rather than writing small amounts about lots of different topics. This way I can talk about these in depth.
Subscribe to:
Comments (Atom)